Signed in as:
filler@godaddy.com

I love adding sauteed mushrooms, onions, peppers, or even a bit of spinach or purslane for a yummy scramble that is great for basically any meal. You do have to soak the pepitas (pumpkin seeds) for about an hour before using, though, so give yourself time to do that.
AND... if you like breakfast burritos, combined with the super-healthy grain-free tortillas in the second half of this recipe - you are going to be in heaven! Spice them up any way you like.
1 cup raw pepitas (green pumpkin seeds)
1/2 tsp. black salt
Spices:
Spices can be changed - the combination below is the original, but you could switch them for cumin, some hot peppers, or whatever you like for Mexican-style flavors if you like breakfast burritos.
Original spices:
1 tsp. ground turmeric
1/4 tsp. pepper (for flavor and to activate the anti-inflammatory benefits of the turmeric)
1 tsp. onion powder
1 tsp. garlic powder
Place the pumpkin seeds in a bowl and cover with boiling water. Add an extra 1 inch of water to the top to allow for the seeds to expans. Soak them for one hour.
Once they're finished soaking, briefly rub the seeds with your fingers - it will remove a bit more of the green from the seeds.
Drain the seeds and rinse under cold water and drain again.
Place the seeds and 2 cups of fresh water along with the black salt and whatever spices you desire into a blender.
Blend on high speed until completely smooth, and cook right away. You can also store the mixture in a glass jar for a couple of days. I do this often!
Heat a non-stick skillet over medium heat (See my video below for the best non-toxic, non-stick around!) and add about 1/2 cup batter to the skillet.
Let the batter cook until it solidifies a bit, much like when you scramble eggs. Stir the mixture occasionally to make fluffy curds.
If you're adding chopped veggies, you can either do it before if you like them very well cooked, or if not so well done, you can cook them in with the pepita mixture.
Serve immediately.
No need to use wheat or corn to enjoy delicious wraps or tortillas!
These are super simple and delicious and very filling. In this photo, I've made a delicious flat tortilla with Not Eggs and some lettuce and avocado with a side of tomatoes (it was so good!) but you can easily make them large enough for breakfast burritos as mentioned above, or to serve with any veggies, beans, or even sauerkraut or hummus. The possibilities are endless!
Ingredients:
· 1 cup chickpea (garbanzo bean) flour
· ½ cup yucca flour (or tapioca flour)
· 2 oz. fresh spinach leaves
· 1 to 1 ¼ cups water depending on chia seeds or no**
· 1 Tbsp. chia seeds and/or 1 Tbsp. flax seeds (optional)
· ½ tsp. pink salt
Directions:
1. Process all the ingredients in food processor or blender until the batter is smooth. If you did not use chia seeds, you can get away with 1 cup of water, but if you use chia or flax seeds. The goal is to get the batter easy to pour. If you want thicker tortillas, less water. Thinner tortillas, more water.
2. Pour approximately 1/3 cup of batter into a heated non-stick pan. No need to use oil. (I use the Chef’s Foundry ceramic coated pans and love them!)
3. Cook for about two minutes on low to medium heat – be sure the tortillas are set and cooked on the bottom before flipping to the other side and cooking another minute or so. Time will depend on thickness of the tortillas.
4. Eat right away with your favorite fillings. (Try the vegan taco meat recipe below – it’s great with your favorite salsa and veggies!)
Notes:
* You can substitute sweet potato leaves or purslane for the spinach. I have used both, and they all work equally well. I have also added a few basil leaves for extra kick.
** The amount of water definitely depends on whether or not you use chia and/or flax seeds. I’ve used them individually or together, or with no seeds at all. All versions are equally delicious, just different!
I have also added turmeric and pepper to these, but when I do that, I always use a filling that has some fat – like avocado – to make sure the turmeric does its job as an anti-inflammatory spice.
You can add whatever herbs you like – oregano, dried basil, etc.
This is one of my favorite recipes and is included in "Don't Let the Memories Fade".
I make these often. They are delicious, gluten-free, anti-inflammatory, and they
freeze well. A great light breakfast with a cup of coffee or tea.
Ingredients:
• 1 cup packed sweet potato puree – approximately one medium
sweet potato (see Note below)
• 3 Tbsp. ground flaxseed left to sit in half a cup of water for ten minutes
• 2 Tbsp. olive oil
• ¾ cup coconut milk (or almond or hemp milk, although coconut
tastes best)
• ½ cup real maple syrup
• 1 cup organic brown rice flour
• ¼ cup coconut flour
• 1 Tbsp. ground cinnamon
• 1 Tbsp. baking powder
• 1 tsp. ground turmeric
• 1 tsp. ground ginger
• ½ tsp. salt
• ⅛ tsp. ground cloves
• ⅛ tsp. ground nutmeg
Directions:
Bake or boil the sweet potato. See the Note below regarding quantity.
After the potato has cooled a bit, process it until it turns into a puree. I use the
food processor because it blends much better in the batter, but you can also
just mash with a fork or potato masher.
Preheat oven to 400°F (200°C).
Oil a 12-count muffin tray or line with silicon baking cups.
Prepare the flaxseed mixture and set aside.
Add the coconut milk, maple syrup, olive oil, and flaxseed mixture to the
sweet potato.
Blend until the mixture reaches a smooth consistency.
Sift the flours into a separate bowl and add all the dry ingredients.
Add combined dry ingredients to the potato mixture and stir until thoroughly
combined.
Fill prepared muffin tray with batter so that each portion is approximately
2/3 full.
Bake 30 - 35 minutes. Don’t over-bake, these muffins can get dry.
Cool on a rack for at least 5 minutes before enjoying.
* Note: I always cook several sweet potatoes at a time because I use them so much. It’s
easier on me and the environment to cook them in batches and have several ready in
the fridge all the time. Cooked sweet potatoes also freeze well, so cook up a bunch!
I usually double this recipe, so I can freeze the muffins for convenience. They’re so good!

This is one of my favorite Ecuadorian recipes. If you can get green plantains where you are, you can easily make it as well. Here, this dish costs about $3.50 for enough to feed 4 people twice. Very filling, high in protein, and "muy rico" (very tasty). Plantains are an excellent source of vitamin C, fiber, and vitamin B6.
Ingredients:
Directions:
In a large pot (or Dutch oven) bring the vegetables and the chopped plantain to a boil in about 3 cups of water. Reduce heat and simmer until tender.
Once they are all tender, stir in the peanut butter. I use an immersion blender.
Then add the grated plantain. Season to taste with salt and pepper and (optional) Island spice blend. (see below directions). Continue to cook until the grated plantain is also tender and blends with the peanut butter and the other vegetables.
Serve in soup bowls with cilantro, celery leaves or parsley garnish.
Many people add more than just a bit of cilantro to the soup at the end of the cooking process, but it doesn't freeze well. So if you plan on freezing, or if someone in the family doesn't like cilantro, just add the cilantro to individual servings to taste.
Four people can eat twice on this recipe! It also freezes well. Use within 3 months.
Kate's Island Spice
1 tbsp. each dried lemon, orange and lime peel
1 tsp. red chili peppers
1/2 tsp. salt
1/8 tsp. lemon pepper
Mix well and use to taste. Stores well.


Ingredients:
Directions:
In the bowl of food processor, pulse the first 5 ingredients just until the tomatoes are coarsely chopped (do not purée). Transfer the sauce to a large bowl. Season with the nutritional yeast and salt.
Toss the sauce immediately with your choice of freshly cooked gluten-free pasta or zucchini noodles.
Claim your free copy of Nine Vegan Basics. These are easy "must have" recipes for things like sauce, butter and cheese. Just CLICK HERE to ask for your copy. And be sure to check out Kate's YouTube channel for videos demonstrating many delicious whole foods vegan recipes.
Everywhere you go in Ecuador, you will find kiosks selling pan de yucca (yucca bread), often alongside yogurt. When we first moved here it was my go-to on-the-go meal, but when I went totally vegan, I could no longer enjoy these tasty gluten-free treasures.
But - where there is a will, there is a way! And my husband, Lynn, and I figured out a way to make them vegan.
They are ALWAYS a hit with our guests (vegan or not), so after many requests we finally wrote down the recipe and are sharing it.
In Ecuador, we have something called "queso fresco", which basically translates as fresh cheese. It is simply cheese before it has been aged, and it is usually used in the pan de yucca. Fortunately, there is a vegan version, and that's what we use here. But if you can only get vegan mozzarella, your little breads will taste just as good.
One of the ingredients is vegan butter, and we make our own. If you would like the recipes, click on the button just below this post, and you can get that recipe along with many more vegan basics.
Okay - here you go.
Ingredients:
• 2 ½ cups yucca starch/flour
• 2 1/2 cups grated vegan mozzarella cheese OR for a more authentic flavour, use half vegan *queso fresco and half mozzarella.
• 1 tsp baking powder
• Pinch of salt
• 4 oz vegan butter, room temperature
• 2 egg equivalents. (You can use 6 tbsp. water mixed with 2 tbsp. flax meal OR commercial egg replacer
• 2-4 tablespoons of water or almond milk, add more if the dough is dry
Directions:
• Combine the yuca starch or flour, cheese, baking powder and salt in a food processor, blend to mix well.
• Add the vegan butter and egg replacer.
• Mix until small dough balls begin to form, if it's too dry add 1-2 tablespoons of water or milk. Add more if needed.
• Remove the dough from the food processor and roll into a ball. You can make the dough ahead and store in the refrigerator for up to a day.
• To make the dough by hand, combine all the ingredients in large bowl, using melted (cooled down) butter, and mix until you have a smooth dough. It's actually very easy to prepare by hand.
• Pre-heat the oven to 425 F.
• Make small round shaped breads with the dough and place on a cookie sheet with parchment paper.
• Place in the fridge until ready to bake. I find that they turn out best if you do let them chill in the fridge for about 30 minutes before baking.
• Once the oven reaches 425F, place the breads on the middle rack and bake until the breads are golden, about 20 minutes.
• If you want to make them a bit more golden, put them under the broiler for the last few minutes of baking time.
If you are not going to use them all (this recipe makes about 40 small breads), freeze them on a baking sheet then transfer to a container. They freeze well. When baking from frozen, take them out of the freezer about 15 minutes before baking. It will take a little longer to bake them, so just keep checking.
For Ecuadorian readers: We use the Violife brand mozzarella and whatever brand of queso fresco it is that they sell at one of the supermarkets. I’ve tried it with my homemade mozzarella, but it is too soft.
I'd love to hear what you think of them!


Ingredients:
· 1 ½ lb potatoes, peeled and cubed
· 2 cups cauliflower florets
· Salt and pepper to taste
· ½ tsp. nutritional yeast (optional)
· ½ tsp. dried herbs like oregano or basil (optional)
Directions:
Peel and dice the potatoes into small cubes.
Chop the cauliflower into small florets.
Steam them together until they are fork tender.
(While they’re cooking, preheat the oven to 430F.)
Once they're cooked, mash them really well, and add salt and pepper and optional herbs and yeast.
THIS is the tricky part. This is a very sticky mixture, and you want it to be spread on the pan(s) evenly and as thin as possible so that it will get crispy. Be sure to put some water on a spatula to prevent sticking and line the pans with parchment paper.
(Our ovens are small here in Ecuador, so the first time we did this, we piled the whole mixture on one 10 x 15 cookie sheet. That didn’t work so well – too thick, so the crust didn’t get crispy. Next time, we made two pans with a very thin layer of the potato and cauliflower mixture. MUCH better! So be sure to make the crust thin!)
Bakethe crust at 430F for 15 to 20 minutes until it is golden brown. We have a convection oven, so we put it on convection for the last 10 minutes. That really helped set the dough.
While the crust is cooking – make the vegan pesto.
This is a small batch and just enough for the pizza. Feel free to double it so that you have leftovers for some GF pasta or another pizza.
Ingredients:
· 1 cup fresh basil, tightly packed
· ¼ cup walnuts
· 1 large clove garlic, roughly chopped
· ¼ cup extra virgin olive oil
· Pinch of sea salt and freshly ground black pepper
· ½ Tbsp. lemon juice
· 2 Tbsp. nutritional yeast
Directions:
Put the basil, walnuts and garlic into the food processor, pulse until coarsely ground. Scrape any extra off the sides.
Turn the motor on again and drizzle the oil in a thin stream into the mixture. Then add the salt, pepper, lemon and nutritional yeast. Blend until you’re happy with the consistency.
Once the crust is nicely browned, bring it out of the oven and spread the pesto over the pizza.
Then add whatever toppings you'd like - just don't make them heavy.
We like vegan mozzarella shreds, very thinly sliced peppers, red onions, mushrooms and tomatoes, and, for a truly decadent flavor – we spread a whole roasted and smashed garlic glove over the pizza.
If you like a little spice, add some dried chili peppers or finely sliced jalapeno or aji peppers (be sure to remove the seeds).
Bake another 15 to 20 minutes, depending on toppings.
I also add nutritional yeast to the top before it goes into the oven, but you could also do it just before serving.
Just before serving you could also add fresh dark greens like arugula for extra nutrition and taste, but it will completely depend on your toppings.
Extra Ingredient: Kate recently did a video demonstrating a delicious VEGAN MOZZARELLA recipe. Click HERE to get the recipe and see the demonstration.
If you'd like more awesome vegan recipes, be sure to get your copy of Don't Let the Memories Fade. It is filled with tasty, brain-healthy recipes sure to tickle your taste buds.
I'm really excited to share this recipe. I made the soup last night for a dinner party, and it was a big hit, so I thought you all would enjoy it. Lots of spice, creamy deliciousness and super-duper anti-inflammatory, brain-healthy nutrition.
Ingredients:
1 Tbsp. coconut oil
1 small red, brown or white onion, chopped in small pieces
4 cloves garlic, minced
1 medium red pepper, chopped in small pieces
1 1/2 cups cooked chickpeas (or one 15 oz. can)
4 cups vegetable broth
1 1/2 tsp. cumin
2 tsp. curry powder
1/2 tsp. turmeric
3 cups coconut milk (canned, full fat is most delicious and gives the best texture, but you can use lower fat if you feel you must LOL)
1/2 cup cooked brown rice
Salt and pepper to taste (I used lemon pepper - it was incredible!)
1 tsp. or so lime juice (to taste)
For Extra Flavor and Texture
I sauteed about 4 oz. of mushrooms with garlic in coconut oil, then added them to the soup as I was re-heating it just before serving. Kapow!
Directions:
In a large saucepan, melt the coconut oil and saute and onion, garlic and pepper over medium heat until soft - about 10 minutes. Don't let them get brown or crispy - just soft.
When the vegetables are nearly tender, add the cumin, turmeric and curry powder, cook with the vegetables until fragrant.
Add the chickpeas and vegetable broth and coconut milk.
Bring to a boil then reduce heat to low, gently simmer for at least 10 minutes.
Add the brown rice and lime juice, and salt and pepper. Adjust for taste.
I let the pot sit for about an hour, then heated it up gently again just before serving. That was when I added the mushrooms.
It was so rich and flavorful! The sitting time let the flavors really meld, but you can certainly serve right away.
We love this recipe over gluten-free pasta (like quinoa or chia – not corn or rice), or over vegetables. It is awesome on broccoli or green beans. It’s inexpensive, versatile, and packed full of healthy ingredients.
This sauce is awesome on nachos. Scroll down a bit and you'll see my recipe for vegan taco meat to add for even more flavor.
Ingredients:
· 1 cup potatoes, peeled and diced
· ¼ cup diced carrots
· ¼ cup diced onions
· 1 cup broth reserved from cooking vegetables
· ½ cup white beans (either from a can or cooked)
· 4 Tbsp. nutritional yeast flakes
· 1 Tbsp. lemon juice
· 1 tsp. salt
· ½ tsp. garlic powder
· ½ tsp. onion powder
· ¼ tsp. dry mustard (gives it a bit more color and taste)
· 1 pinch paprika
· 1 pinch cayenne pepper (optional)
(Update December 2021 - I recently was able to get my hands on some liquid smoke, so when I made the sauce last time, I added about 1/8 tsp. of liquid smoke to the mixture. Wow! - Definitely something to try.)
Directions:
Cook the vegetables in about 3 cups of water until they are tender. Depending on size of pieces, it should take about 15 minutes.
Drain the vegetables but reserve 1 cup of the water.
Place the veggies, the 1 cup of reserved water and all other ingredients in a blender (preferably with a glass bowl to avoid plastic leaching).
Blend until smooth.
Serve over veggies, gluten-free pasta, or anything else you can imagine! We occasionally use it with gluten-free baked chips and vegan taco meat with home-made salsa and guacamole for amazing vegan nachos.
I have frozen this sauce and it’s okay, but it does separate when it thaws. Store in the fridge - best to use within about 4 days.

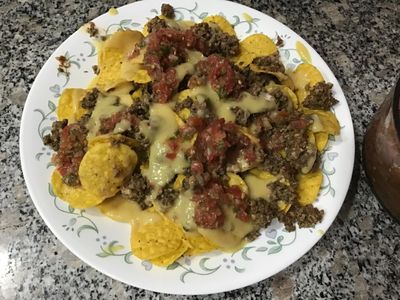
.... this is an easy recipe with endless possibilities. Depicted here - nachos with vegan cheese sauce and this taco meat. They were SOOOO delicious!
And remember, walnuts AND mushrooms are very powerful brain-boosting foods, so... eat up!
- dash of avocado oil for frying
- 1/4 cup finely chopped onions
- 16 oz. mushrooms – I prefer cremini because they are more solid, but you can also use white mushrooms in a pinch
- 3 or 4 cloves finely chopped garlic
- 1 cup walnuts
- 1 tsp. chili powder
- 1 tsp. smoked paprika
- 1/2 tsp. ground cumin - add more if you like a more southwestern taste
- 1/2 to 3/4 tsp. pink salt
- 1/2 cup fresh salsa
- 1 tbsp. tomato paste (If you don't have it, just add a bit more salsa, or if you have some pimiento, salzado sauce or something similar, substitute with that.)
1. Place the mushrooms in your food processor and grind up until they look like grains of wild rice
2. Heat the oil, then cook the onions over medium heat just until barely tender
3. Add the mushrooms to the pan and and cook them over medium heat. The idea is to get the liquid out and let the mushrooms absorb the flavor of the onion. This can take 5 or 6 minutes depending on how much water is in the mushrooms.
4. When the mushrooms are nearly cooked, add the garlic and allow that flavor to meld with the mushroom. If you're not a big fan of garlic, add the garlic with the onions, as the earlier you add it, the less flavor of garlic. Garlic is an extremely powerful brain food too, so I like to use it in just about everything!
5. Place the walnuts in the food processor and pulse until they also look like grains of wild rice.
6. Add them to the mushroom mixture and cook for 3 minutes or so.
7. Add all the rest of the ingredients and mix well. Cook another 3 to 5 minutes.
Now you have delicious vegan taco meat that you can add to many dishes.
... and filled with healthy probiotics...
I have received several requests for this recipe as people are looking for plant-based alternatives to yogurt. I love the flavor, but I have to say, it is a bit of work. Here in Ecuador, I buy coconuts or the meat and coconut water from street vendors, so I can make the milk very thick and creamy. If you are in North America or Europe, it might be a bit more difficult to get the consistency you desire, but it's well worth the experimentation. And even if it doesn't turn out as thick as you would like initially, you can still use it in place of milk in recipes or over oatmeal or .. wherever. It is amazing!
This recipe is included in the "Vegan Basics" section of "Don't Let the Memories Fade", which is now available in paperback and eBook.
***
You need a crock pot or Instant Pot for this recipe – and this is fussy and takes time and planning. This also works for soy milk, and I’m told it is thicker, although I do not eat much soy.
Making this is a bit of a process because it usually takes a couple of batches to get it really thick. If you’re somewhere where coconut milk is mostly sold in cans, you can certainly use that. Or coconut cream is even better so that the yogurt will be thicker.
Ingredients:
· 4 cups coconut cream if possible (milk will do)
· 1 capsule of a good probiotic (the more strains the better) OR 1 container of plain coconut yogurt from the store to use as a starter
Directions:
Place the 4 cups of coconut milk in the crockpot and turn it on low. Let sit for 2.5 hours.
When the 2.5 hours are up, turn the crockpot off and let it sit for 2 hours.
When the 2 hours are up, take 1 cup of the warm milk or cream out of the crockpot and mix it with the starter OR empty the contents of the probiotic capsule into the cup and mix very well. If you’re using a starter yogurt, leave it out for a couple of hours so it is not cold when you mix it up with the warm milk from the crock pot.
Put the mixture back in the crockpot and take the vessel out of the heating element, wrap in a heavy towel, and either put it in a cupboard or inside the oven (that is not turned on) for 8 to 10 hours. This is where the magic happens.
I started off with 9 hours and it was a bit too much so I now only do it for 8 hours, but it kind of depends on how “sour” you like your yogurt to taste.
After the 8 or 9 or 10 hours – take it out of wherever you’ve let it sit and put the vessel in the fridge to cool.
If you’re using probiotics it will take a few batches to get thicker yogurt. But from now on you don’t have to use the probiotics. You are going to save ½ cup of the yogurt you’ve made to use for your next batch.
It will be runny at first. I use it for smoothies, but if you want to have it thicker, just strain it so that the heavier/thicker batch is separated from the runnier product.
For the Vegan Tzatziki Sauce recipe in Don't Let the Memories Fade, you will want a thicker yogurt more like Greek yogurt, so you might just want to use a plain vegan yogurt from the store.
Quick, easy, and incredibly delicious.
Make zucchini spirals, spaghetti squash, or quinoa or chia pasta and top with this delicious sauce.
Serve with a green salad and you have the perfect meal for any night of the week.
This sauce is great no matter what you put it on! Just have your veggies or pasta basically cooked when you start the sauce, as it is ready fast.
The “Alfredo” sauce Ingredients:
Directions:
Mix all ingredients together in a small saucepan, whisk until smooth.
Heat until sauce thickens and begins to boil, then stir in the spiralized zucchini, spaghetti squash, or pasta and remove from the heat.
Serve immediately, sprinkling with nutritional yeast or vegan parmesan.
The Video that is linked to the photo on the right also demonstrates this recipe, along with a delicious vegan pesto. Combine the two for even more flavor!
This is one of the delicious vegan recipes included in "Don't Let the Memories Fade".

Vegan Pesto Alfredo Sauce demonstrated by Kate Kunkel
This is a featured recipe in the book, which is now available for pre-order, at Amazon.com.
Official release date is September 12, 2020, what would have been my mom's 82nd birthday.
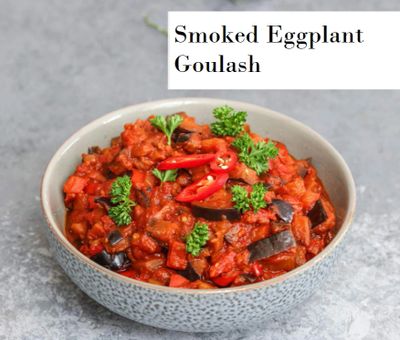
Prep time for this very easy dish is about 30 minutes, cooking about 30 minutes
Ingredients:
· 2 eggplants
· 2 Tbsp. olive oil
· 1 onion, diced
· 2 garlic cloves, minced
· 1 red bell pepper, chopped
· 1 red chili pepper, finely chopped
· 1 Tbsp. lemon juice
· 1 tsp. smoked paprika
· 1 tsp. sweet paprika
· 1 can chopped tomatoes
· 1 tbsp. tomato paste
· 2 Tbsp. chopped parsley
Directions:
Wash the eggplants and cut them into ¼ inch slices. Arrange on a baking sheet and season on both sides with salt. Set aside for about 20 -30 minutes, until the salt pulls the water out of the eggplant.
In a large pot over medium heat, pour 1 tablespoon of oil and sauté the onion for 2 mins, then add the minced garlic and cook together for another 1-2 mins.
Add the chopped red pepper and finely chopped chili peppers. Sauté for about 4 minutes stirring constantly.
Dry the eggplant with paper towels and cut into cubes. Add it to the pan with remaining tablespoon of oil.
Stirring occasionally, continue cooking for approximately 10 minutes. While the mixture is cooking, add the lemon juice, season with paprika powder and freshly ground black pepper .
Add in the chopped tomatoes and tomato paste, stir and bring to a boil.
Cover and cook for another 15 minutes until the eggplant is soft.
If necessary, you can add a few tablespoons of water to reach desired consistency of the sauce.
Taste test for salt - but generally you don't need to add any because the eggplant will have absorbed some from the water-extraction.
Serve over whole grain rice or gluten-free pasta or, for extra veggie goodness, over spiralized zucchini and/or carrots. Garnish with parsley.
Serves 4.

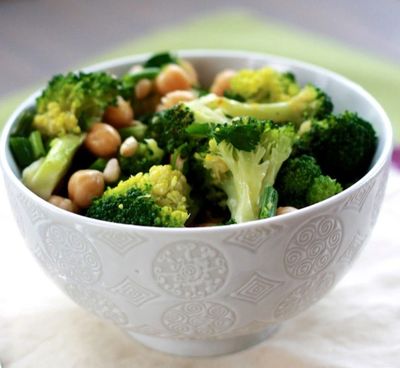
This luscious creamy soup is high in protein thanks to the chickpea flour and nut milk (almond or soy) and the broccoli. You're also getting brain-nurturing fats in the olive oil and coconut milk.
Heat the oil in a large pot and sauté the vegetables for about 3 minutes, then add the garlic and continue cooking, stirring frequently, until the onion, carrots and celery have softened.
Sprinkle the flour onto the vegetables and cook another 2 minutes, stirring continuously.
Slowly add the vegetable broth and plant milk, stirring continuously to avoid lumps.
Add the coconut milk and nutritional yeast and simmer for 15 minutes.
Add the lemon juice, salt and pepper. Adjust seasoning per your preference.
Serve hot.
If you like a smoother soup, use an immersion blender when all is done.
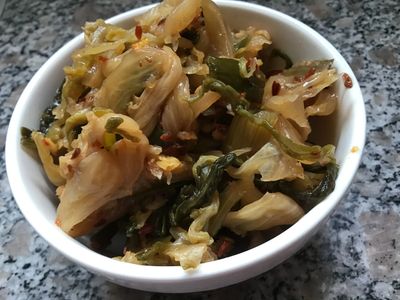
Simple Cabbage Kimchi
Besides being amazing for the brain, fermented foods are also good for the immune system. Check out THIS ARTICLE.
I love kimchi because I like spices. It is also very easy and is ready in just a couple of days, although it does take some time to chop and prepare. You’ll want to use gloves to mix this because of the red pepper.
Ingredients:
· 1 head Napa cabbage (2 pounds or so)
· 1/4 cup iodine-free sea salt or pink salt
· Filtered water
· 1 tbsp. grated garlic
· 1 tbsp. grated peeled fresh ginger
· 1 tsp. sugar
· 3 tbsp. water
· 1 to 5 tbsp. Korean red pepper flakes. I only use 2 tbsp. because it's pretty hot. If you can’t get these just use regular red (chili) pepper flakes
· 8 oz. daikon or Korean radish, peeled and cut into matchstick size pieces. I can’t get this here in Ecuador all the time, so have just used regular radishes. It works okay; just be sure they are solid.
· 4 medium scallions, trimmed and cut into 1-inch pieces
Directions:
· Cut the cabbage lengthwise through the stem into quarters. Cut the cores from each piece. Cut each quarter into 2-inch-wide strips.
· Place the cabbage in a large bowl and sprinkle with the salt. Massage the salt into the cabbage until it starts to soften a bit. Then add enough water to cover the cabbage. Put a plate on top of the cabbage and weigh it down with something heavy and let it stand for an hour and a half or two.
· Rinse the cabbage under cold water 3 or 4 times. It's important to get all the salt and brine off the mixture. Set aside to drain in a colander for 15 to 20 minutes.
· While that’s draining, make the spice paste. Add the garlic, ginger, sugar, and water and stir into a smooth paste in a large bowl. Stir in the red pepper. Set this aside until the cabbage is completely drained.
· Gently squeeze any remaining water from the cabbage and add it to the spice paste. Add the radish and scallions.
· Using your hands, gently work the paste into the vegetables until they are thoroughly coated. This is where you need gloves, because those red pepper flakes can be pretty hot!
· Pack the kimchi into a 1-quart jar. Press down on the kimchi until the brine (the liquid that comes out) rises to cover the vegetables, leaving at least 1 inch of space at the top. Seal the jar.
· Let it ferment for 1 to 5 days. Place a shallow bowl under the jar to help catch any overflow. Like sauerkraut or any other ferments, you want to keep the kimchi out of direct sunlight, at cool room temperature. Let it sit for 1 to 5 days. You will also see bubbles – open the jar and let the gases escape – but you don’t need weights because you are going to keep pressing down on the veggies with a spoon to make sure they stay submerged.
· You can taste the kimchi every day and stop the fermentation whenever you feel it is the right taste for you. Just be sure to use a clean fork or spoon every time you try it and be sure to submerge the vegetables each time.
· Move the jar to the refrigerator to stop the fermentation. Let it sit for another week in the fridge for best taste, although you could eat it right away.
There are also dozens of recipes for kimchi online – and plenty of videos to help in case you’re a visual learner.
This recipe was developed specifically with the idea to help boost the immune system, which is essential to a healthy brain.
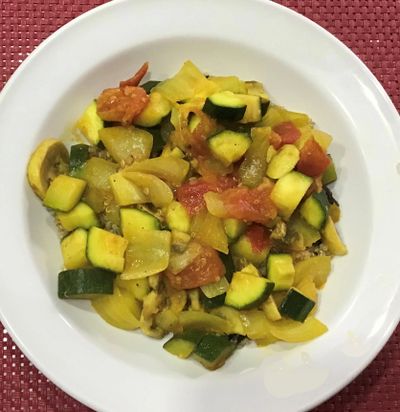
With zucchini, onions, garlic, mushrooms, quinoa, beans, and lots of spice, this covers nearly every requirement for a brain and immunity-boosting meal.
And - all of the ingredients are EASILY available in Ecuador and any place I've ever lived. It's also incredibly easy to make, especially if you used canned black beans.

Easiest Brain Booster
Makes 4 generous servings
4 medium zucchini squash = I like two green and two yellow for color, but whatever you can find
2 medium ripe tomatoes
1 large or 2 small onions
3 to 4 cloves garlic
220 grams (8 oz) thinly sliced mushrooms - any kind will do and a mixture is even better
2 tbsp. Coconut oil for frying
Spices
4 tsps. Curry
2 tbsps. Turmeric
1 tsp. back pepper
2 tbsps. Ground ginger, or a good 1 inch piece of fresh ginger grated
1 tsp. paprika (I like Hungarian but whatever you have – add more to taste)
1 lemon, juiced
Quinoa and Beans
2 cups cooked quinoa
1 cup cooked black beans
1 to 1.5 tbsp. Olive oil for flavoring mixture
Salt to taste
Lemon pepper or regular pepper – whatever you have, to taste
If you’re using dried beans, obviously you will have had to soak and cook them ahead of time. If using canned beans, one can is sufficient – you will just be adding them to the quinoa once it is cooked.
Cook the quinoa. It takes around 20 minutes so if you’re a slow sous chef, cut up the veggies first. If you’re speedy, cut them up after you start the quinoa. It takes about 20 minutes.
Cut up all the veggies. I cut the zucchini lengthwise, then halve them again and slice the quarters into ½ inch pieces. Tomatoes - into 8 pieces each or so. Cut the onion into slivers to soak up the spices and oil. Crush garlic and ginger if you are using fresh ginger. Thin slice the mushrooms.
Put the coconut oil in your wok or similar pan, heat it just to warm then add the turmeric, curry, pepper, paprika (and ginger if you’re using dried). Stir up the spices with a wooden paddle or spoon until they are aromatic, then throw in the onions.
Cook over medium to medium-high heat, stirring often, for about 5 minutes until the onions are just heading to soft. Then add the garlic and if using fresh ginger, add that now. Mix well and continue stirring to release all the aromatics. You want the onions to be semi-soft.
Now add the zucchini and continue stirring, until the zucchini is just bordering on tender. Add the tomatoes, stir a couple of times. Then add the mushrooms. Keep stirring and add salt to taste. Just before all the veggies are at your desired level of “doneness”, add the lemon juice, also to taste.
I add just enough to brighten up the dish and lift all the spices, but this is definitely a “to taste” thing.
I put any extra lemon juice in with the quinoa and black beans.
Now that the veggies are basically done, your quinoa should be ready. Add the beans to the quinoa along with the salt and pepper and olive oil. The remaining lemon juice can go in here if you like.
Mix well.
Serve the quinoa and rice on the bottom of flat soup-like bowls and cover with your veggies.
Served with a small green salad with purple onion, cucumber, lime and cilantro, you have a high protein, nutrient rich meal full of antioxidants and immune boosters
This is excerpted from my book, “Don’t Let the Memories Fade – a Holistic Approach to Preventin Dementia and Creating a Healthy, More Vibant Future”